- Goal
- What is Shell?
- Preparation
- Related Manual
- Step-by-step Operations
- [1] Run Microsoft Visual Studio 2022
- [2] Open sorurce code
- [3] Build the files
- [4] Pack the files to TMflow Shell format
- [5] Put the Shell file in USB stick
- [6] Run TMflow2.16(simulator)
- [7] Import files & activate the shell
- [8] Run TMflow again with shell
- [9] Modify the TMflow Project
- [10] Debugging mode while developing the shell
- [11] Deploy to real robot
- [12] Update and uninstall the shell
- Q&A
Examples are valid for
TMflow Software version: 2.16.2400 or later
TM Robot Hardware version: HW3.2 / HW5.x
Other specific requirements: TMcraft Packer 1.12.1100 or later
Note that older or newer software versions may have different results.
Goal #
This is a tutorial for running a sample shell on your robot. There are the advantages of using shell:
Full-Screen Interface
You can run your full-screen user interface(shell) on robot controller now! Operate and monitor the process in the way you want for all-time operation.
Simplify the Operation
For some standardized applications such as parts loading/unloading, dispensing, you can develope and deploy shell on the robots to simplify the operation.
Leverage the Power of TMflow
TMflow is always runing in the background, switch back to TMflow for advanced operation at anytime!
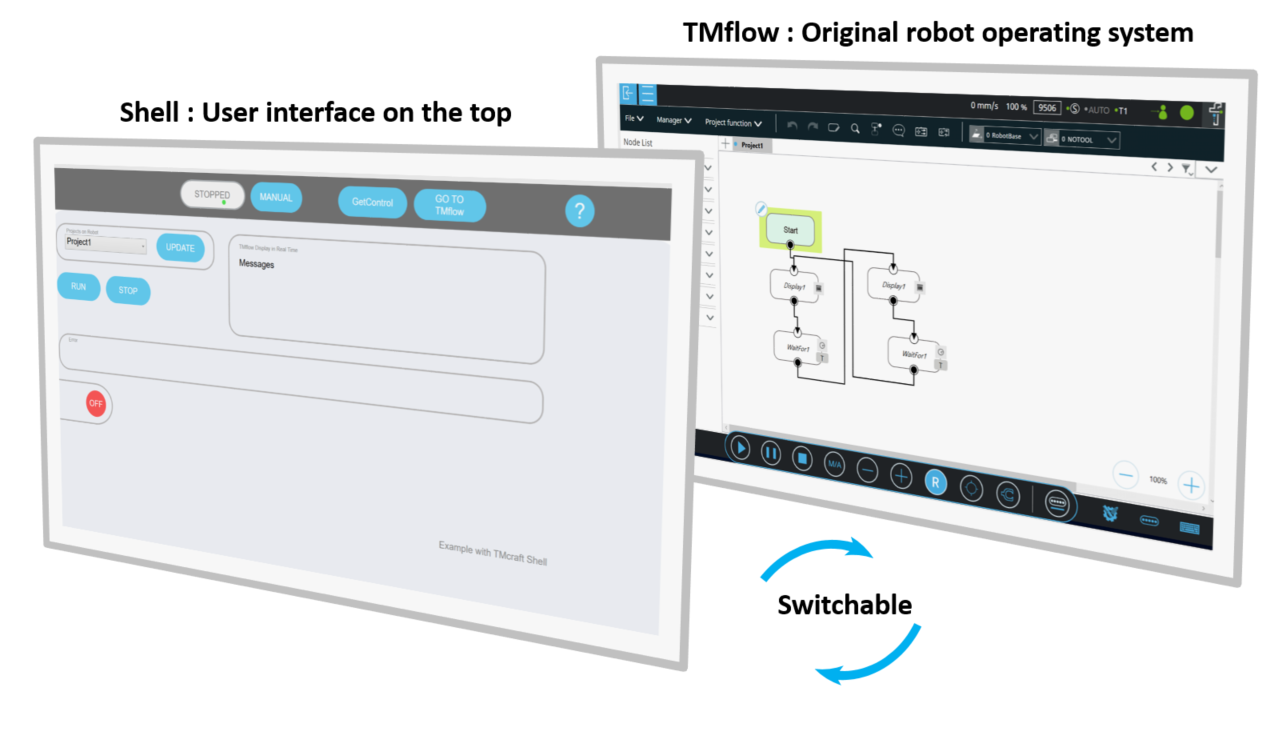
What is Shell? #
- Shell is a standard new feature comes with TMflow2.16.
- Shell is a customized C#/WPF application that runs on the robot controller.
- You can develope your own shell application in C#/WPF.
- Shell runs in a container of TMflow, and shell is on the top for user to operate by default.
- TM provides free TMcraft API library for your shell to communicate with TMflow easily.
Your shell could interact with TMflow through TMcraft API, such as changing TMflow projects, read variables, run project, etc.
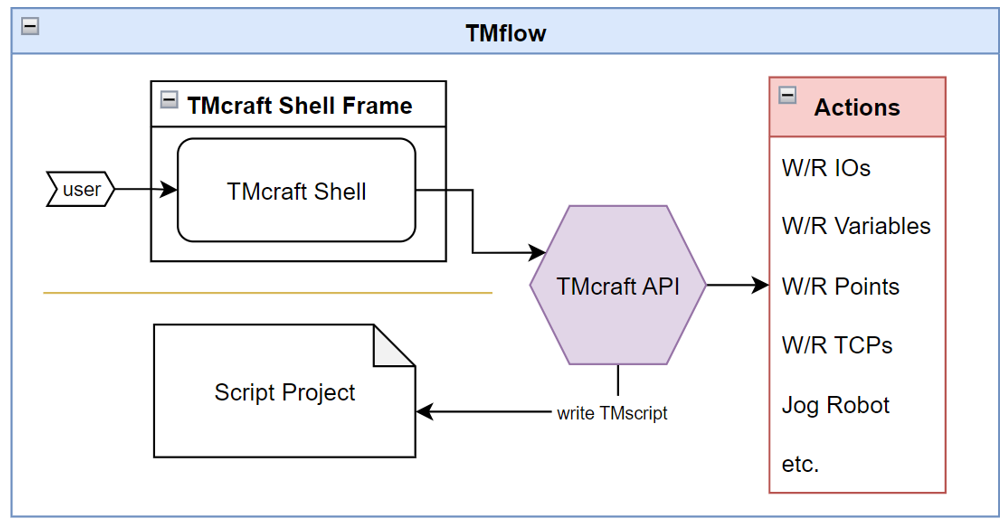
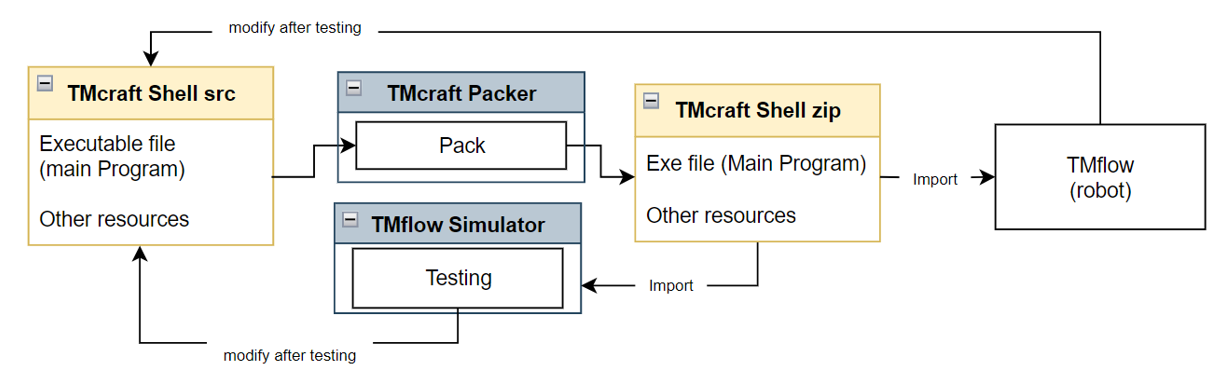
This is a glance of developing a shell:
Preparation #
- [P1] [Robot] TM robot with TMflow2.16.2400(or later)
- [P2] [PC] Install same version of TMflow on your PC(Win10) for testing (there is virtual robot/simulator comes with TMflow2.16 )
- [P3] [PC] Install Microsoft Visual Studio 2022(or later) and C# and WPF package
- [P4] [PC] Install TMcraft Packer1.12.1100(or later) (at TM download center, search TMcraft Development Kit_2.16 and download it)
- [P5] [PC] Copy TMcraft 1.12.1100(or later) folder (at TM download center, search TMcraft Development Kit_2.16 and download it)
- [P6] [PC] Download source code of shell RunProject v1.0.0.1

- [P7] [PC] Download packed file of shell Packed RunProject v1.0.0.1 (this file is the same result in [Step4])
- [P8] Basic knowledge on Microsoft Visual Studio, C# and WPF
- [P9] A USB stick(name with TMROBOT) for data transffering
- [P10] Download TMflow Projects and TMflow Global Variables and upzip in USB stick’s root folder TM_Export
Related Manual #
- TMcraft Shell Development Kit 2.16 – (at TM download center, search TMcraft Development Kit_2.16 and download it)
Step-by-step Operations #
[1] Run Microsoft Visual Studio 2022 #
Execute Microsoft Visual Studio 2022.
[2] Open sorurce code #
Unzip and open [P6]RunProject/Runproject.sln, then you should have the view below:
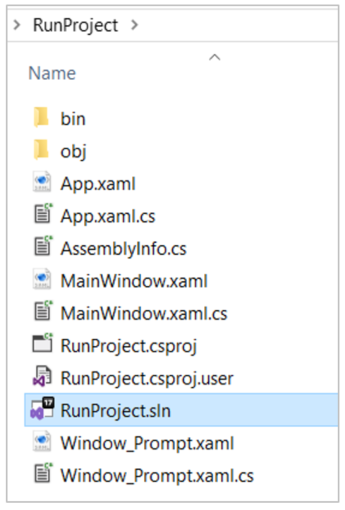
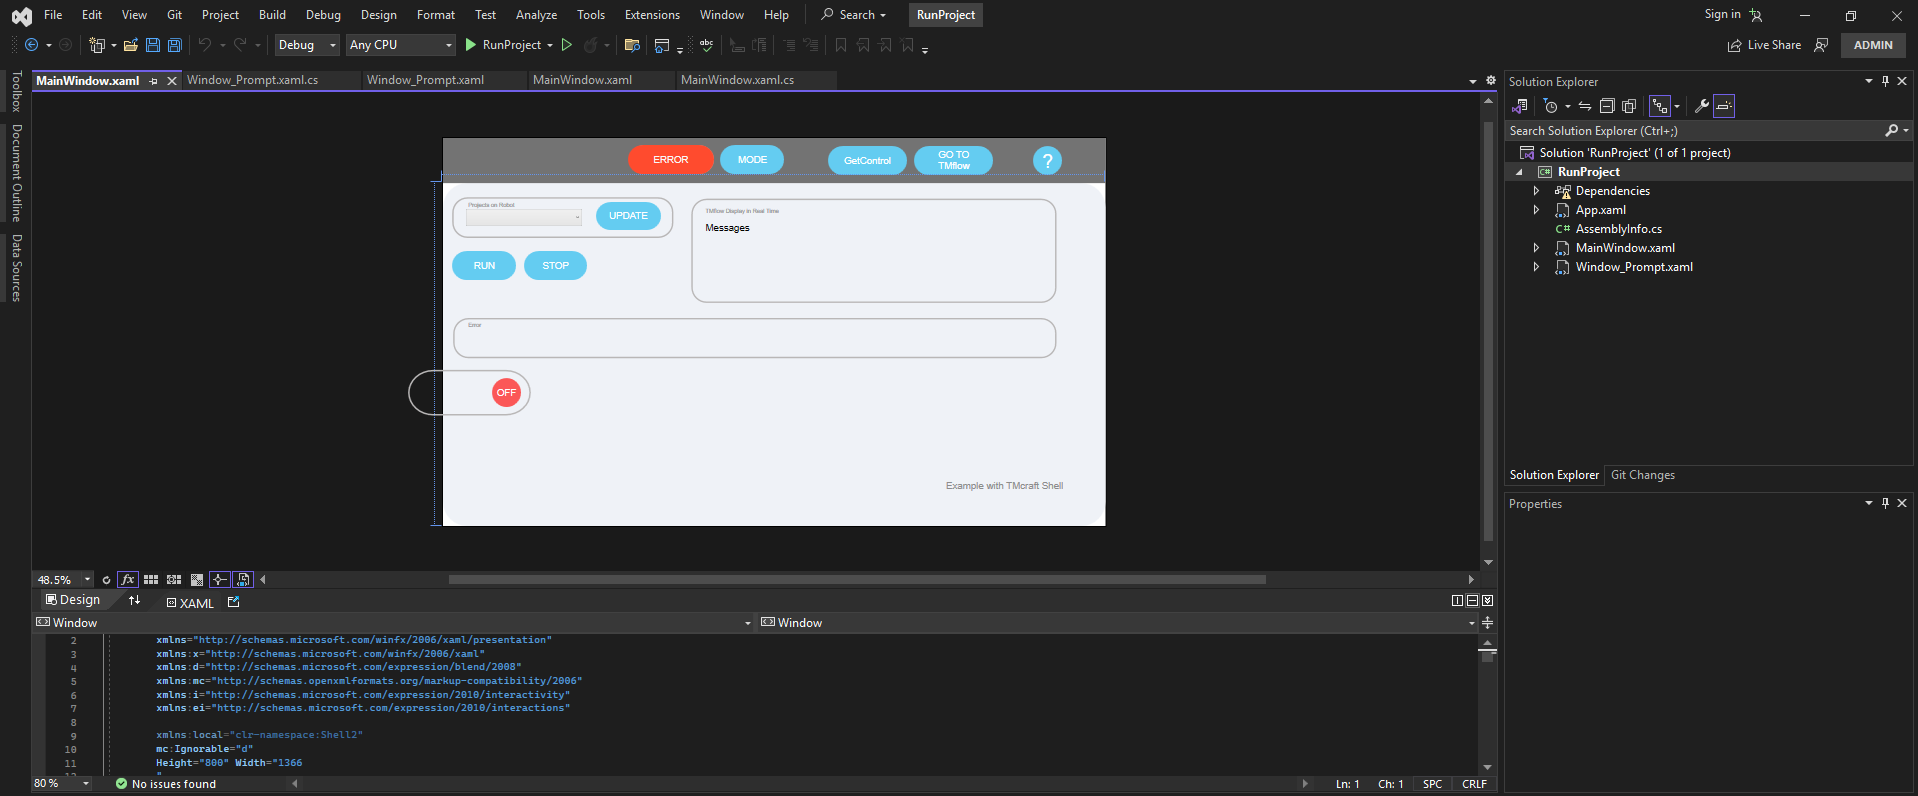
There are two main files: MainWindow.xaml(main user interface) and Window_Prompt.xaml(hint window when you click “?”).
You can modify it as you want or just leave them here.
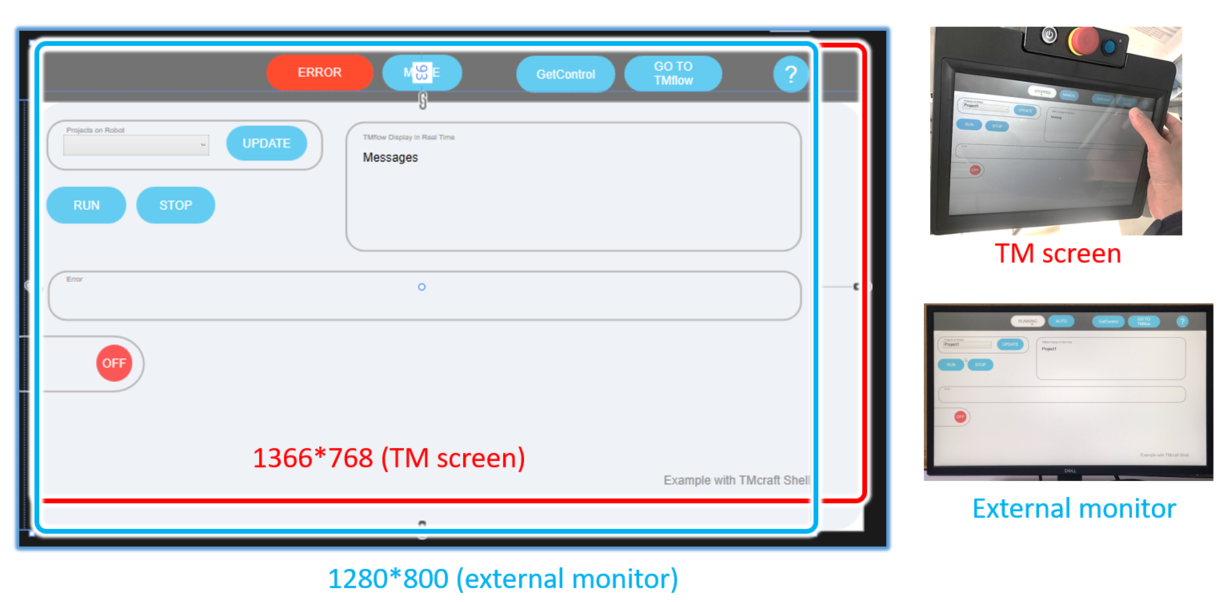
About the Resolution of Shell
There are 2 configurations of resolution:
- TM screen: the resolution will be fixed to 1366*768 when it is attached to stick.
- External monitor: when TM screen is detached, it will output 1280*800 automatically.
Due to this mechanism, please consider two resolutions with your shell. In this example, the resolution of view is programmed to 1280*800 and works on both resolutions.
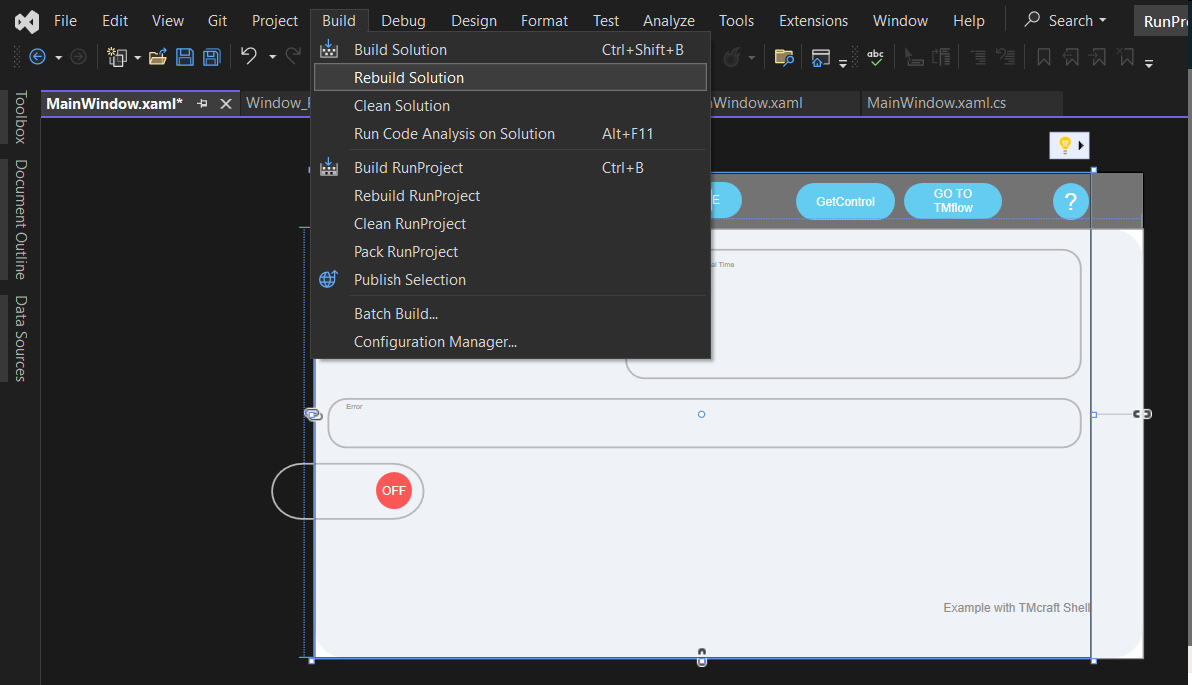
[3] Build the files #
Navigate to Tab>Build>Rebuild Solution:
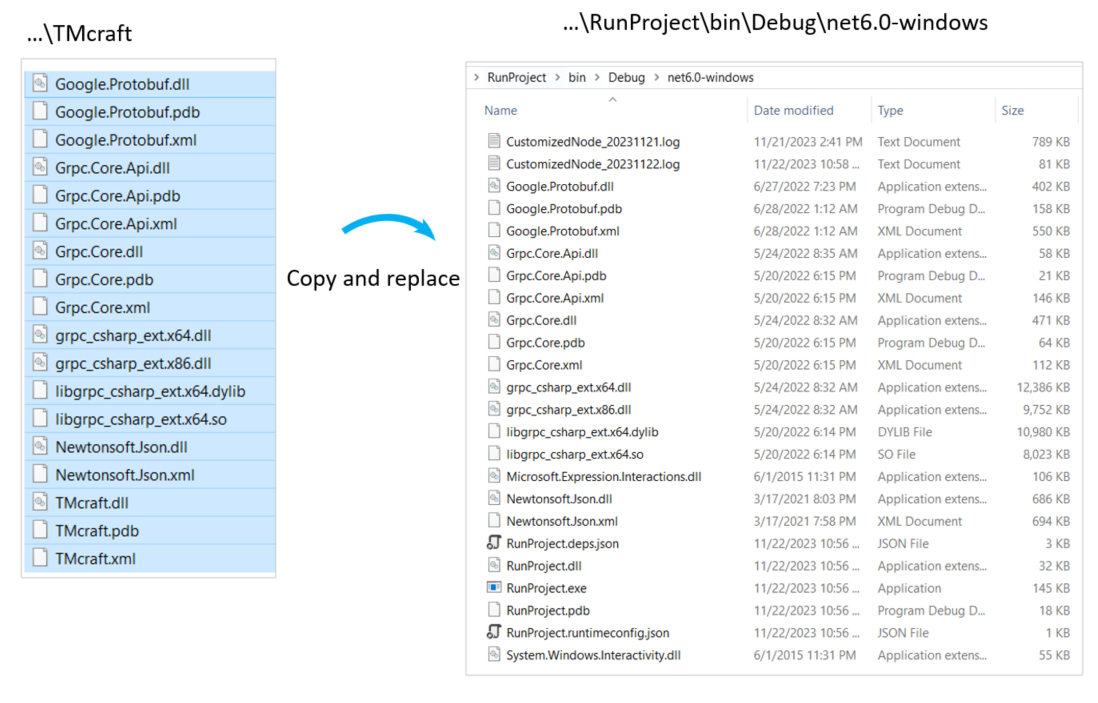
When it is done, copy [P5] \TMcraft files and REPLACE them to the folder(…\RunProject\bin\Debug\net6.0-windows) of built target:
[4] Pack the files to TMflow Shell format #
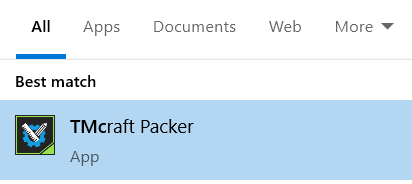
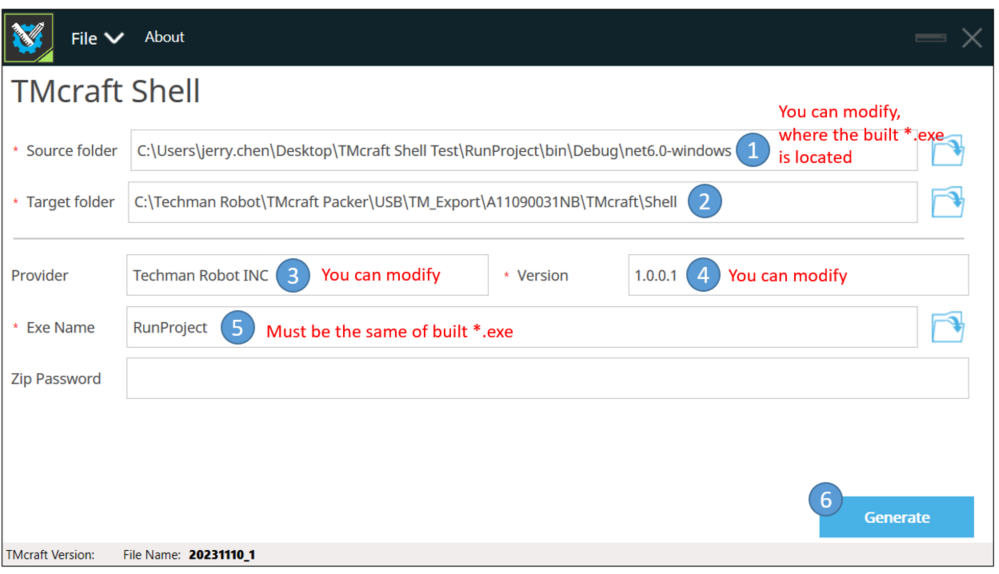
Run [P4] TMcraft Packer, select SHELL and enter any project name, then CREATE. This is the configuration of building Shell.
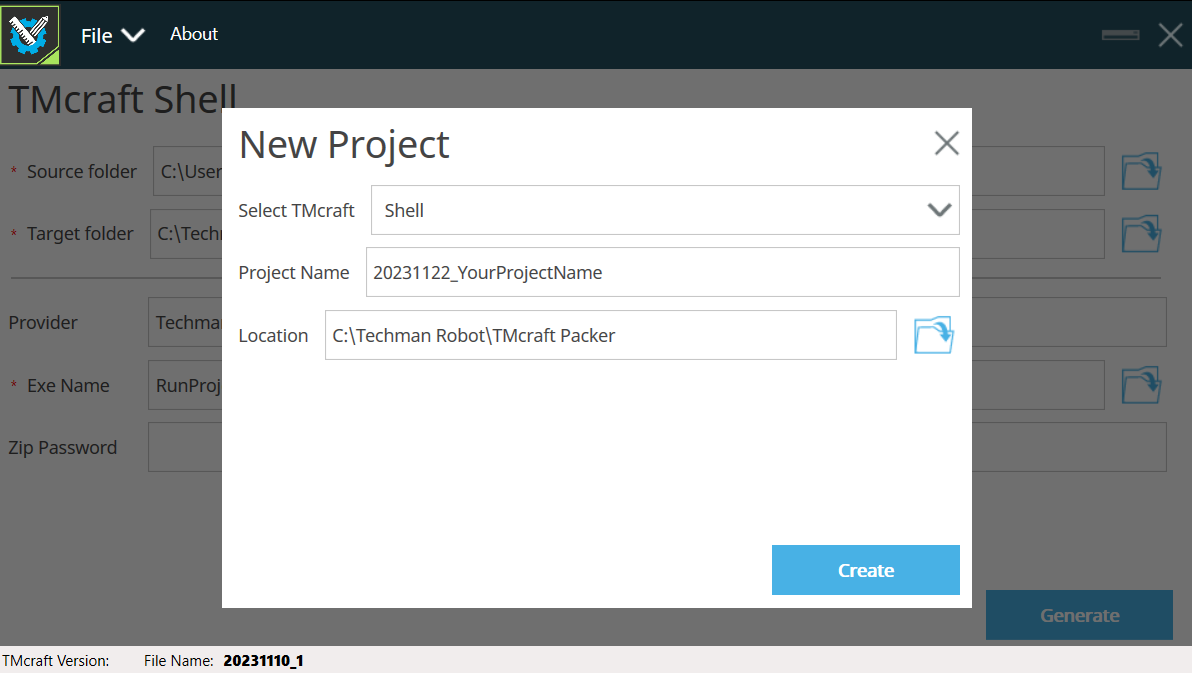
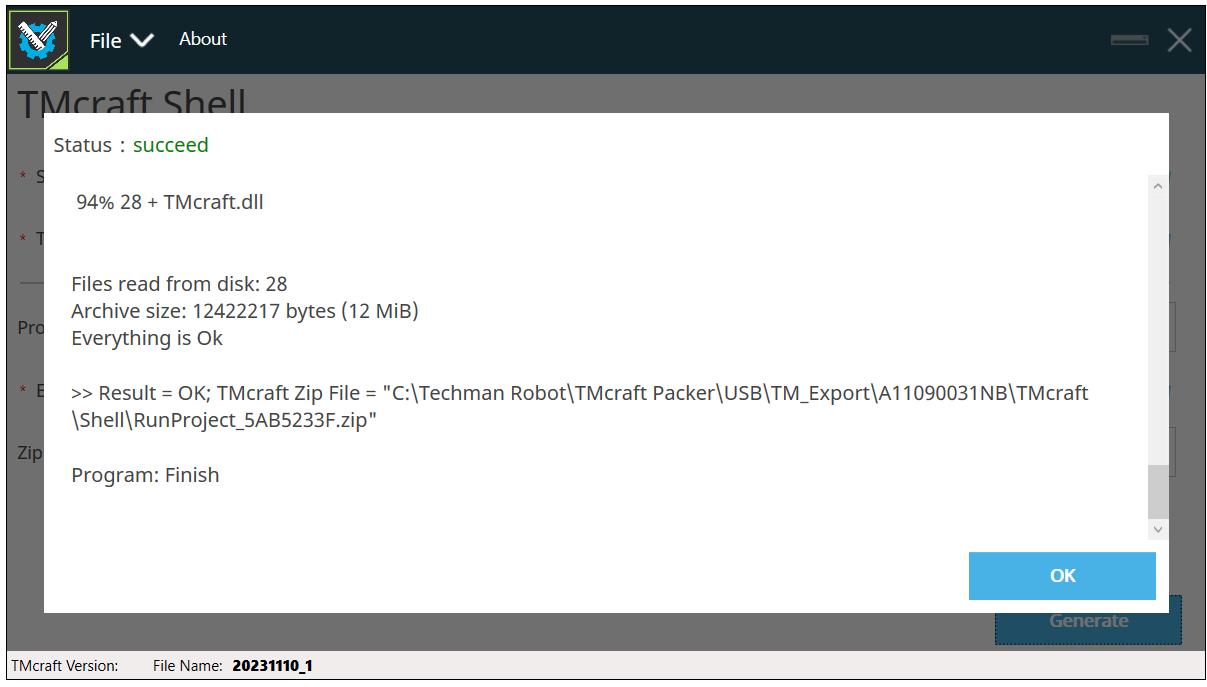
Follow instructions below to finish the settings, then click GENERATE and OK when it is done. Make sure there is Everything is Ok on the screen:
[5] Put the Shell file in USB stick #
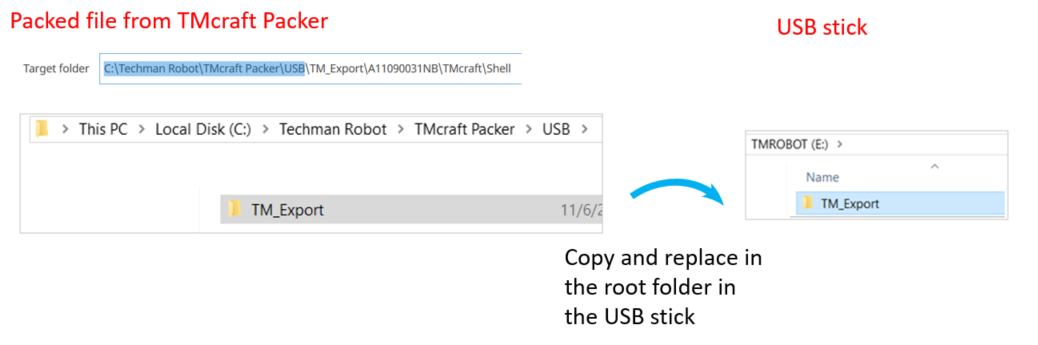
The packed file is in the folder(for example, C:\Techman Robot\TMcraft Packer\USB\TM_Export\A11090031NB\TMcraft\Shell, target folder in [Step4]). Copy the TM_Export (the packed file is in this folder also)folder and replace it to the root folder in the USB stick[P9] USB stick with name of “TMROBOT”:
A11090031NB is the name of PC.
[6] Run TMflow2.16(simulator) #
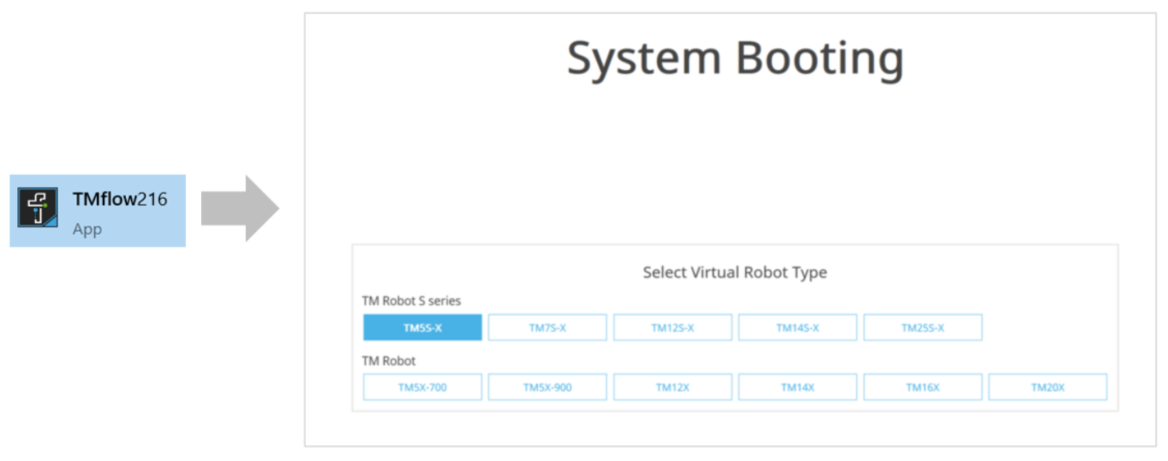
The virtual robot/simulator is a standard new feature when you install TMflow2.16 on your PC.
In [P2]TMflow, run it on your PC and select any virtual robot(TM5S-X for example):
When it boots successfully, follow steps below:
- [1] Navigate to Menu>Login, then enter 127.0.0.1(virtual robot) and click CONNECTT, then click GET CONTROL.
- [2] Switch from auto mode to manual mode(T1 mode). At the button of TMflow, [hold M/A for 2 sec] > [+] > [-] > [+] >[+] > [-] > [click M/A] > [click M/A], then mode will switch to T1 mode.
- Then you should have this:
[7] Import files & activate the shell #
- Copy TM_Export from ([P10] TMflow Projects and TMflow Global Variables) to the root folder of USB stick in [Step5] Put the Shell file in USB stick
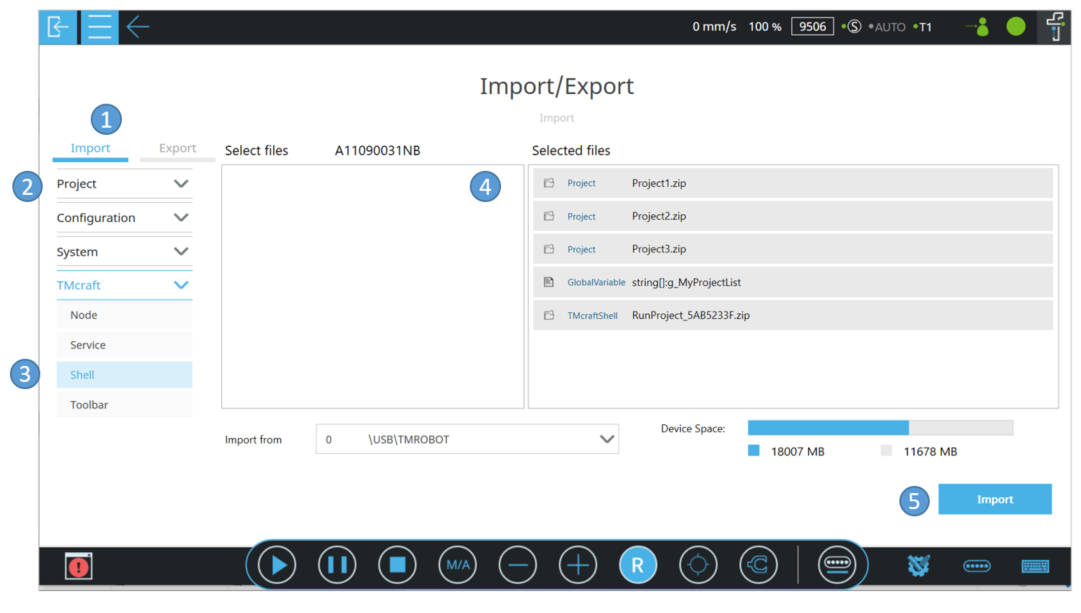
- Navigate to Menu>System>Import/Export
- Import TMflow projects, global variables and TMcraft shell as below:

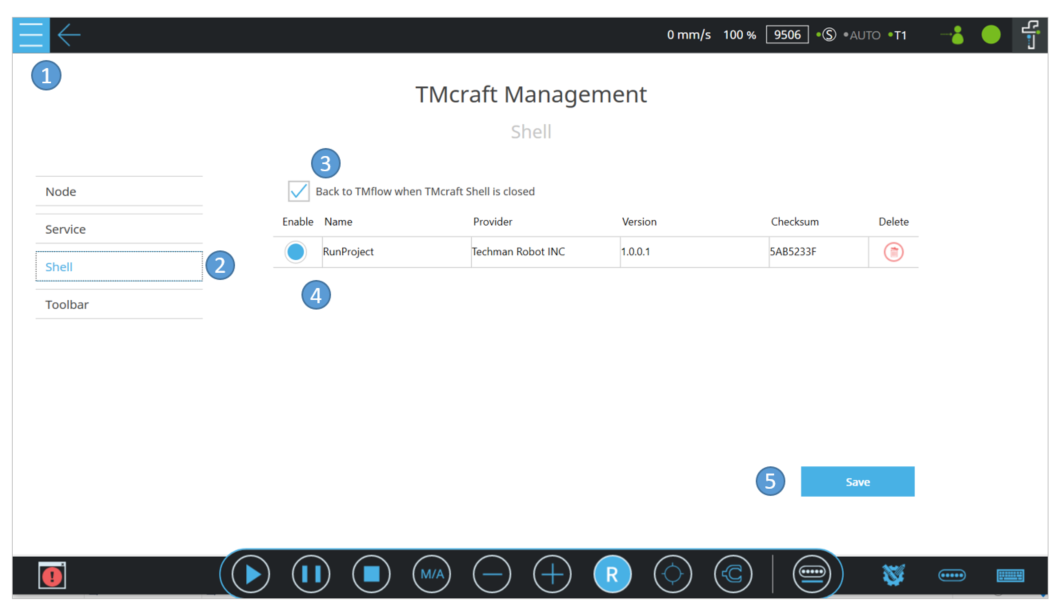
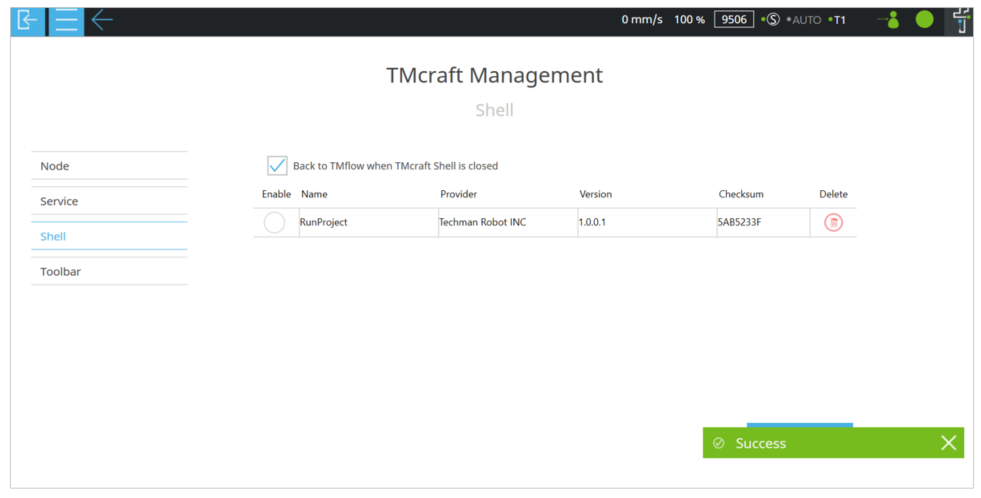
- Navigate to Menu>Configuration>TMcraft Management
- Activate the shell as below, then leave TMflow(Menu>Leave) for rebooting
- If you are using a real robot, reboot the robot at the end of this step
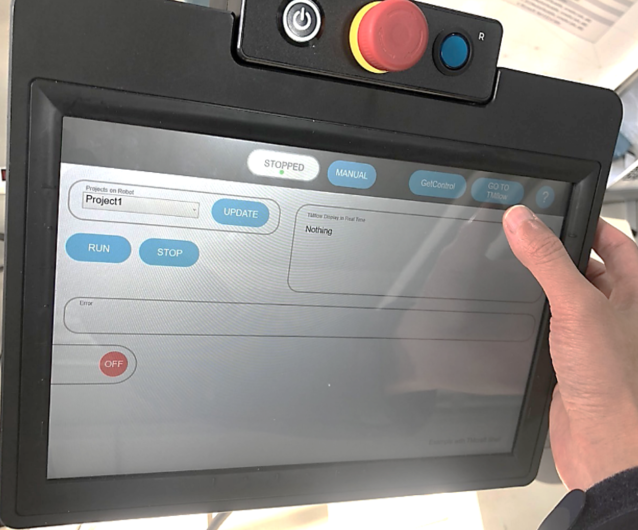
[8] Run TMflow again with shell #
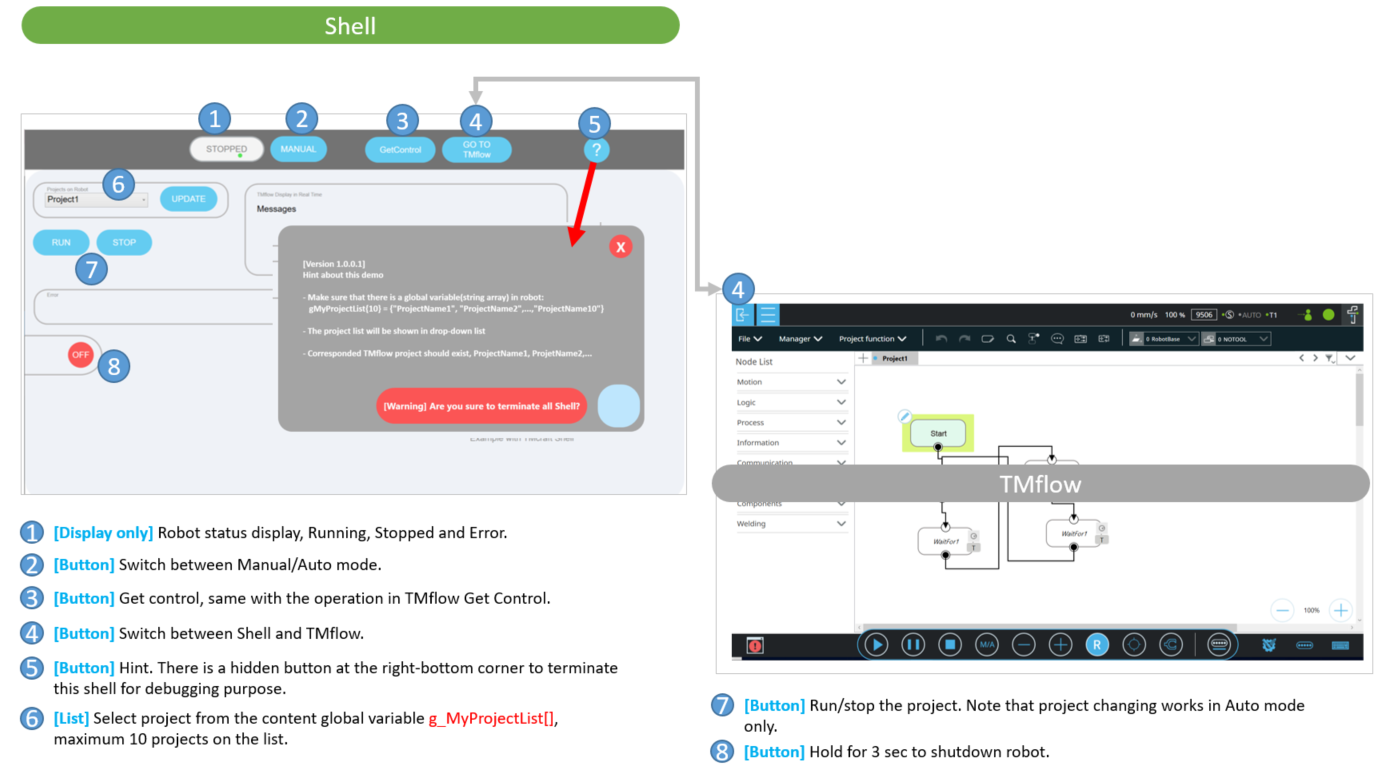
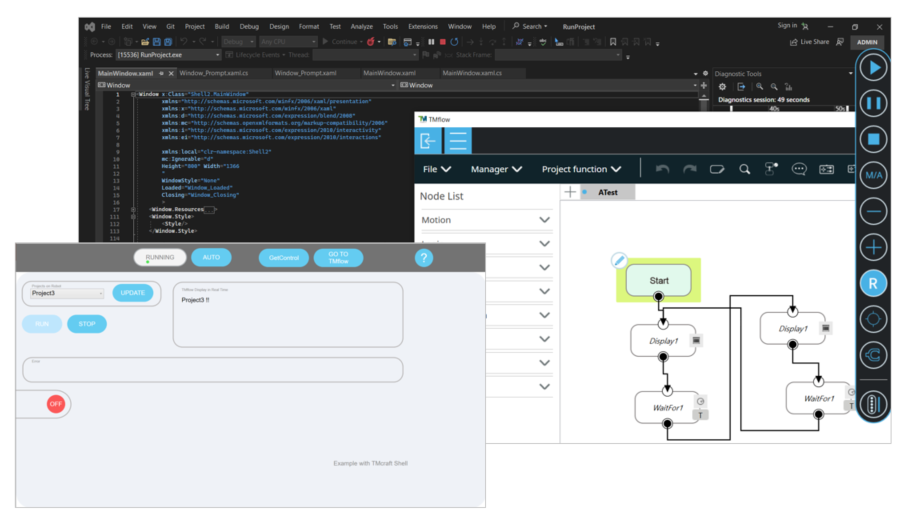
Now the shell is ready. Run TMflow, it will start the shell at beginning. There are some hints to operating the shell:
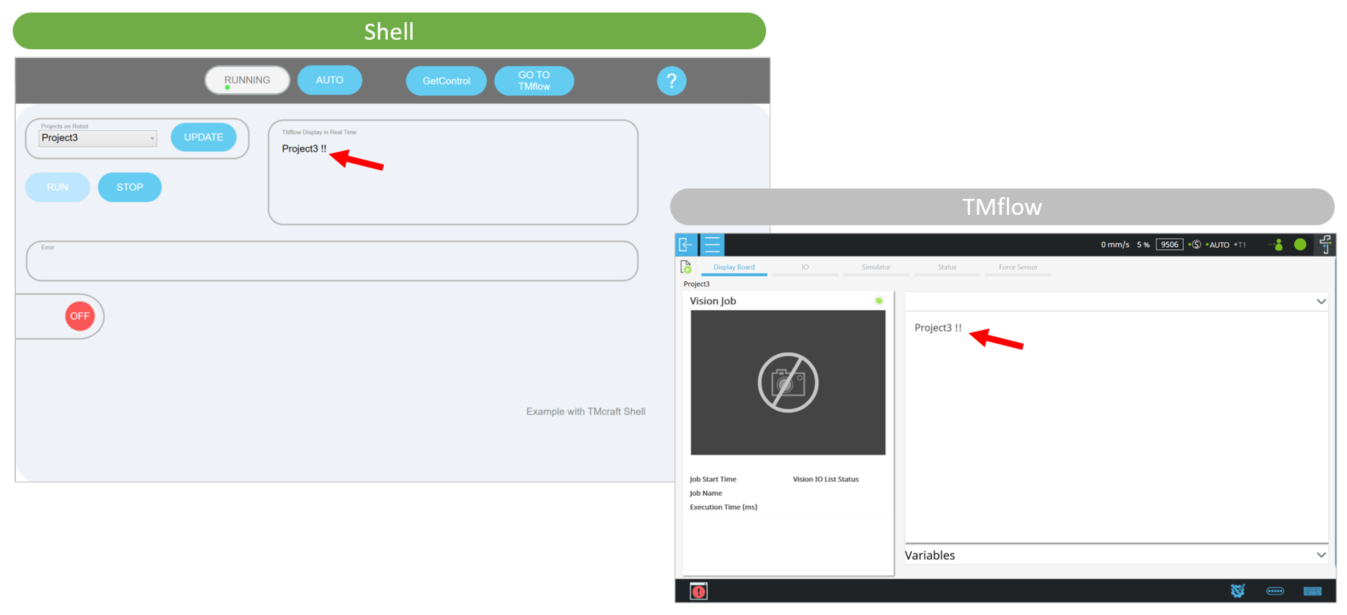
Select and run Project3, you will see the display result(same on TMflow display page) as below
[9] Modify the TMflow Project #
If you want to add more TMflow proejcts to test, follow steps below:
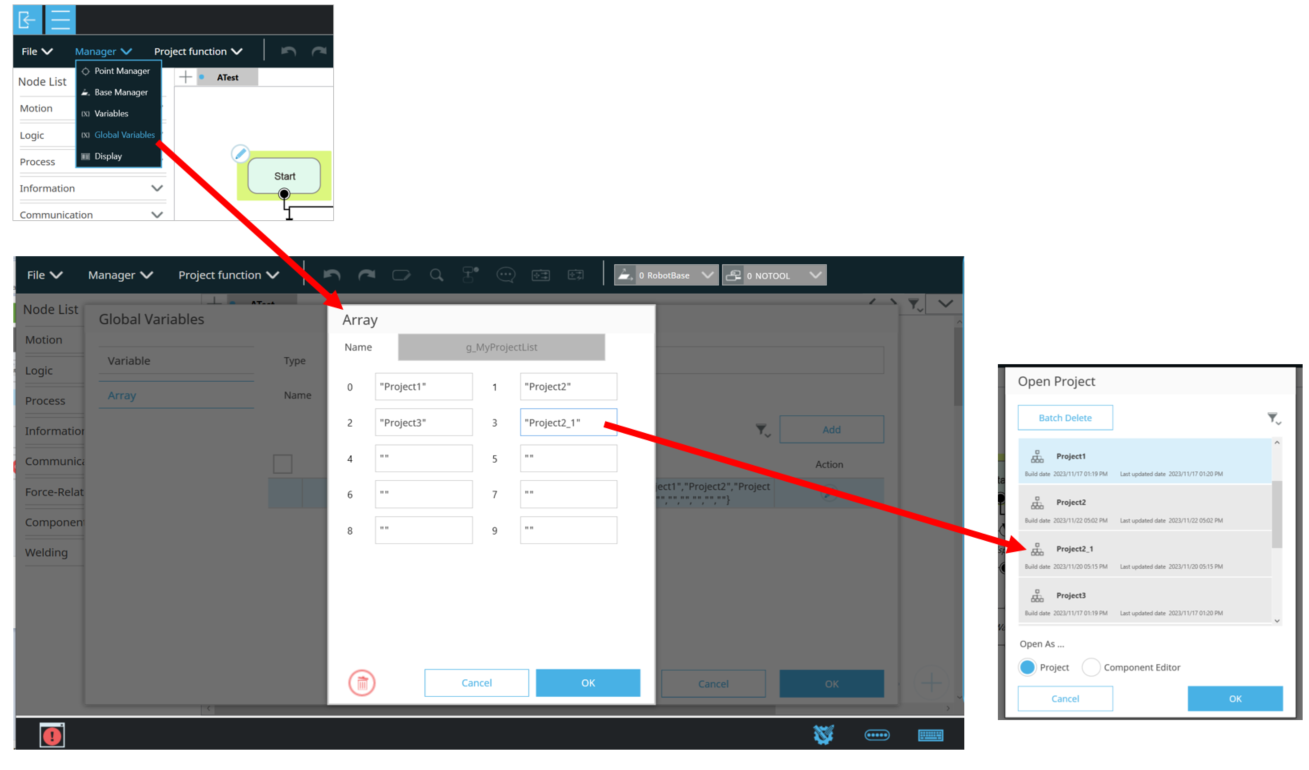
- Open any TMflow proejct, then navigate to Manager/Global Variables, then modify the content of g_MyProjctList as below(Project2_1 is added)
- Copy Project2 to Project2_1
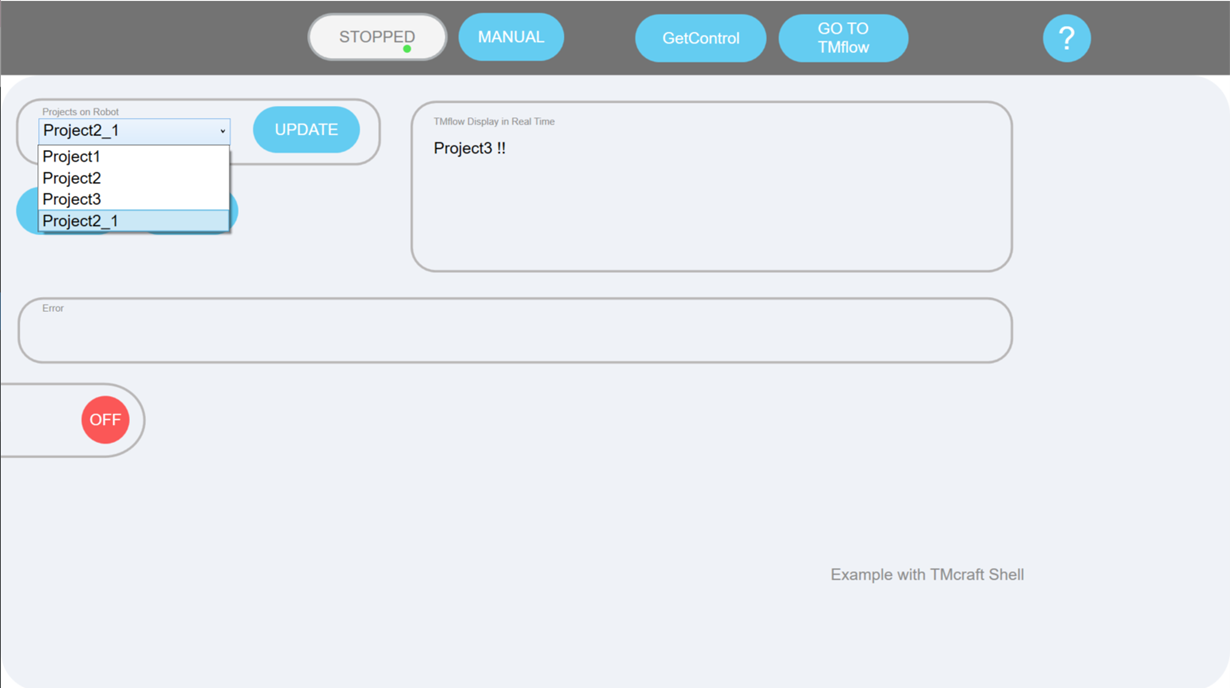
- Go back to the shell, click UPDATE, you should see Project2_1 now
[10] Debugging mode while developing the shell #
When you are in the debugging phase, you can run the shell(RunProject.exe) and it will connect to TMflow(virtual robot) automatically.
So you can test it before pack it to Shell, make debugging easier.
[11] Deploy to real robot #
You can follow the same procedure in [Steps 7-9] to deploy the shell on real robot when you have enough test on virtual robot. Enjoy the ride!
[12] Update and uninstall the shell #
If you want to update the shell:
- First disable the shell as below.
- Reboot the robot.
- Import a new shell, and overwrite it.
- Enable the shell.
- Reboot the robot.
- Your new shell is ready.
If you want to uninstall the shell:
- First disable the shell as below.
- Reboot the robot.
- Delete the shell.
Q&A #
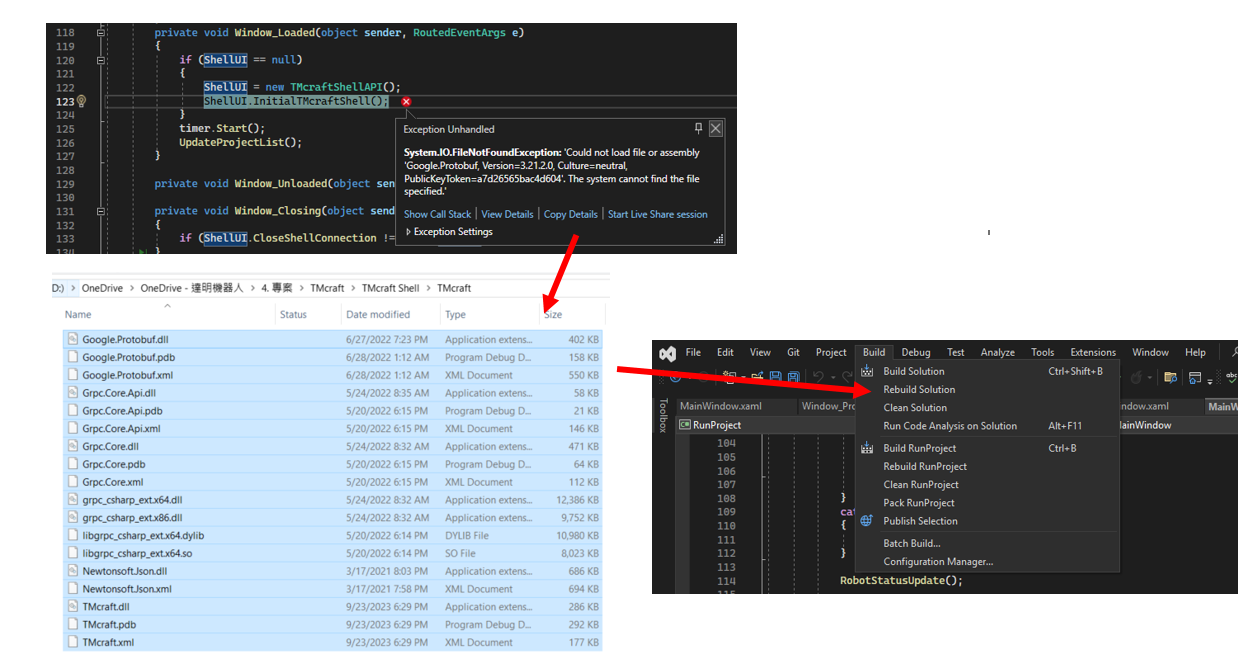
Q1. Exception when running the shell? #
A1.
Sometimes the libraries will be lost when rebuilding the shell. Copy and paste them from TMcraft folder again in [Step3], and rebuild the shell might fix this issue.